Brides! 10 Things To Check With Your MUAH Before Making That Final Call!

Assuming that you must be super busy with your wedding preparations we thought to give some 'gyaan' on the most important thing that is bridal makeup! Yes brides! Your makeup is something that can totally make or break your bridal look. You might be paying most of the attention to your bridal lehenga & jewellery but if your makeup is not up to the mark, then your whole bridal look can go for a toss. Since, we don't want you to make small mistakes while picking your bridal makeup artist we gotta you these 10 things to check with your makeup artist and hairstylist aka MUAH before making that final call. So, whether you're having a destination wedding or getting a makeover for your mehendi, haldi, or sangeet ensure to follow this WMG makeup checklist for getting that flawless skin on your wedding day without any hassle!
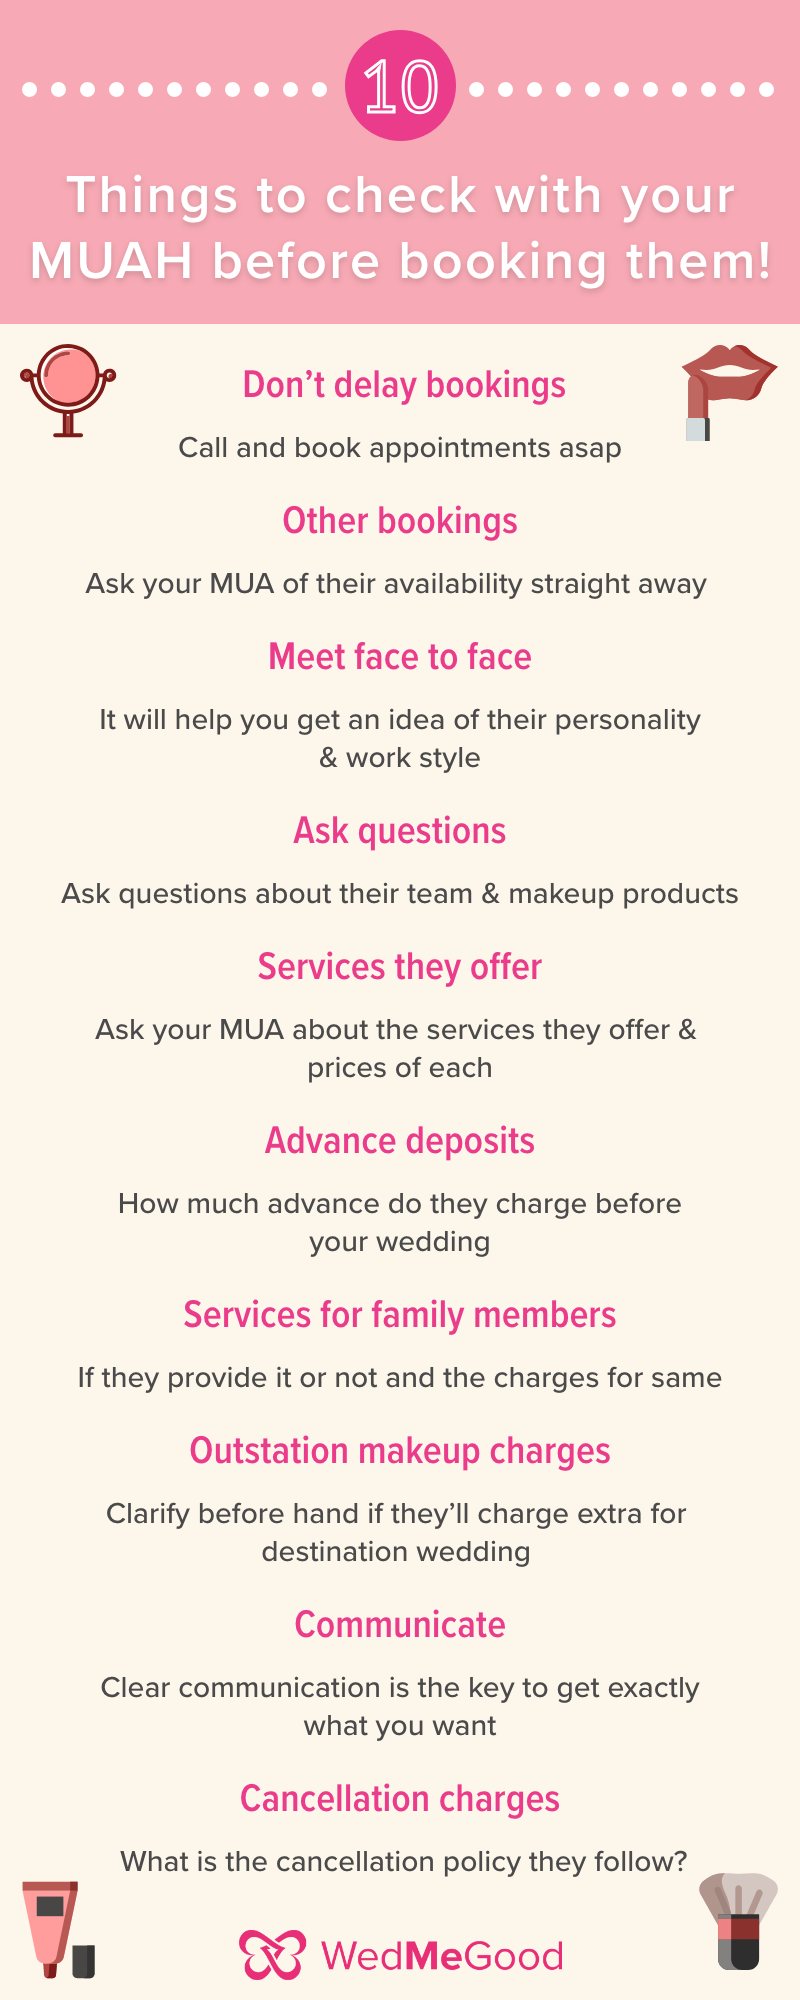
30 Essential Bridal Makeup Tips For A Perfect Wedding Look


Your wedding is one of the most important days of your life. A day to be remembered and cherished forever. Also, one you can go back to again and again because of the numerous wedding photographs that you will have. Hence, you want to look your best, with the perfect bridal makeup and hair, when you are immortalized in those wedding albums. Here’s how you can.


immortalized go wrong on your wedding day. You have dreamed and fantasized of this day for a long time. Every single item has been planned down to the smallest detail. What about your own beautiful self? With the dress, accessories, hairstyle and makeup for wedding locked in, you are sure to be the most ravishing bride.

Keep some of these wedding makeup tips in mind and have the dream wedding you always wanted.

Our Top 30 Bridal Makeup Tips

Top Tips for Perfect Wedding Makeup Application


Tip #1 Stay oil-free


Remember to use oil-free products to prevent a shine from building up on your face. Better, keep oil-free blotting sheets handy. Never wipe, but gently blot if you feel your face getting oily.

Tip #2 More is good


Your wedding is the one time that we will encourage more makeup than you would usually apply. The camera tends to tone down the look. But ensure that they have not been simply plastered on! Maintain a good balance while using products.

Tip #3 Practice


If you plan on doing your own makeup, practice how to do bridal makeup several times before the D-day. On the actual day too, start with less. It is much easier to add than to remove.

Tip #4 Don’t forget the primer


After you wash and moisturize your face, apply a primer. Do this before the foundation. Not only will it hide flaws, but it will also hold your makeup and keep it fresh-looking longer.

Pro-Tip: If you are preferring light makeup on your wedding day, you can maybe use Olay Total Effects 7 IN ONE Day Cream Touch of Foundation which will moisturize your face as well as give a touch of sheer foundation, and hence reduce the numerous layers of makeup!

Tip #5 Never use your fingers


Always use a sponge or brush when applying foundation, and never use your fingers. You could transfer bacteria from your fingers to the bottle, and also leave fingerprints on your face. Dab the sponge gently, don’t swipe it across the face.

Tip #6 Concealer trick


Apply the concealer after the foundation to avoid the ‘too made-up’ look. Don’t use the face concealer on your eyes. Get a creamy one which won’t dry through the long day.

Tip #7 The natural look


If you don’t want to look made up and prefer the natural look, we suggest a cream blush. It will make you look healthy and fresh. Dust some translucent powder over it for longer staying power.

Tip #8 Blush trick


Smile and then apply the blush on your cheeks. Blend the blush well into the temple.
5 Best Bridal Eye Makeup Tips

Tip #9 Primer for the eyes


Use a primer on your eyes before the eyeshadow. This will keep the shadow from smudging.

Tip #10 Eyebrows


Use an eyebrow pencil to fill in eyebrows. Select a colour one or two shades lighter than your natural colour.

Tip #11 Getting the eyeshadow right


Start with darkest shade on the outside and get lighter as you move in. If you make a mistake, don’t use a wipe to repair it. You will remove the foundation and concealer too. Use an earbud with a little makeup remover.

Tip #12 Fake it


No bride is complete without fake eyelashes. They’ll make your eyes look larger and more mesmerizing. Use the full lash only if you’re going for the sexy look. For a more subtle play, use individual lashes. Curl your natural lashes and apply mascara before attaching the fake ones. After the glue has dried, curl these lashes and apply mascara again.

Tip #13 No tears makeup


Waterproof your wedding – makeup, mascara and even the glue for the fake eyelashes.
Best Bridal Lips Makeup Tip

Tip #14 Soft lips


Make sure lips are not dry and flaky when you apply lipstick. Use a balm to soften them first. Outline your lips and use a pencil to fill them in. Then apply the coat of lipstick. This will keep the lipstick from disappearing faster. If your lips are thin, dab on a little shimmer to the middle of the lower lip to give a feeling of fullness.


Tip #15 Your makeup kit


Carry a bag with makeup essentials with you – lipstick, oil-blotting sheets, translucent powder and earbuds to remove any makeup build-up in the corner of your eyes

The tips mentioned above are the holy grail of makeup tips for every occasion, however, the ones we are mentioning below, every bride must pay equal or more attention to, as your wedding does not happen every day, and you keep going back to the memories of this day till the time’s end. Hence you need to look your best with a few essential eye, face and lips makeup tips. It also good to note that, the bridal makeup preparation should start at least 2-3 months in advance.

#Tip 16: Get the Details


Before you start finalizing your look, it is necessary to have details regarding your wedding location, the expected weather during your wedding date and also, if it is an outdoor or an indoor wedding.

#Tip 17: Foods to Avoid


Once you have all the details, it is essential to start avoiding heavily fried food items, as this could end up with acne problem just before your wedding day. Also, eat fresh fruits and vegetables for a healthy glow.

#Tip 18: Know What You Want


Now that your face is properly nourished, you must understand what you are exactly looking for as your bridal outfit. (This includes your hair, makeup, clothes, accessories and even shoes!)

#Tip 19: Search for Similar Looks


Once this is in place, look for makeup looks online that you think you want to sport on your D-Day. Please understand this, if your skin tone is different when compared to the model in the image, the same makeup is going to look very different on you. You need to consider this, before finalizing anything.

#Tip 20: Makeup Artists


Start looking for makeup artists for your wedding day. Well, you can be an amazing makeup artist yourself, however, we suggest getting a professional one, because, it is your day to be pampered, and also to get ready stress-free. However, it is just a suggestion, it is entirely your call, if you need one or not.

#Tip 21: Who to Hire?


If you choose to hire a professional makeup artist, ensure that you both understand your needs, the artist is within your budget (do not overshoot budgets! They are made for specific reasonsJ) and someone who is ready to help you with a trial session.

#Tip 22: Trial Session


Trial sessions are going to cost you, but they are worth it, as it will help you understand how you would look on your wedding day. Without a trial, you would have to go for the wedding, with whatever has been applied, even if you don’t like the look, as there is little you would be able to change.

#Tip 23: Time Savers


Trial sessions also help you in making any tweaks to your looks prior to your Special Day, and also saves a lot of time on your wedding day, as the artist writes down every shade, and brand of product used to get that perfect look for you.

#Tip 24: Understand the Difference between Real & Ideal


As already stated above, this is a great opportunity to check whether the make up is matching your skin tone and also, accordingly set your expectations and look details with your artist.

#Tip 25: Allergy Check


They also help in understanding if you are allergic to any makeup product. Hence it is also advisable to take a trial 1-2 months prior to your wedding day.

#Tip 26: Hairstyle Trial


It is also advisable to call your hairstylist on the same day, so that you are clear of your entire bridal look.

#Tip 27: Accessories Check


Carry your accessories and jewelry if possible, to understand if they complement your look.

#Tip 28: Lights


Also, ensure that you have a trial session when there is enough daylight, so that you don’t have to use fluorescent light to check the makeup. Natural light is best way to test your look.

#Tip 29: Pimples


If you get a blemish or a pimple before your wedding day, take a few drops of tea tree oil on a Q-Tip and apply it gently on the breakout. It will zap the pimple naturally! Also, ensure that you do not touch a pimple till is treated, as it could cause more breakouts.

#Tip 30: Beauty Treatments


Also, do not, we repeat, do not get a facial or waxing done 2-3 days before the wedding! Give yourself a good 5-6 days of rest, and skin time to breathe just before the event!

There you go armed with bridal makeup tips that won’t let you down.


7 Beauty Experts Share Their 1 Tip for Wedding Makeup That Lasts All Day


Feeling beautiful on your wedding day is every bride's well-deserved right! Whether you're hiring a glam squad to do your hair and makeup or watching a ton of YouTube beauty videos to learn the tips and tricks yourself, figuring out how to keep your makeup looking perfect all day is something to add to your pre-wedding to-do list. To help make that happen, here is what seven makeup experts recommend as their number one tip for long-lasting wedding day beauty.


1. Line Your Lips


"Line your lips and fill in the entire lip with lip liner. Follow with lipstick (not gloss) and then lightly pat with a tissue before applying the second coat. Also, it's important to remember to apply lipgloss sparingly because gloss tends to take off lip color faster." —Michelle Bouse, founder of Beauty Boutique

2. Don't Rush


"As you've prepared for this day to come, I recommend not rushing by having your hair and makeup timed out so you can relax and enjoy the beauty process. Allow at least 45 minutes to an hour for make-up application on your wedding day. Also, It's essential to have so you can achieve a flawless application of make-up. Don't forget to wear a button down shirt so you won't smudge your beautiful wedding day hair and make-up." —Tessa McCullough, Makeup Artist at G2O Spa + Salon

3. Take Care of Oil


"If you are feeling oily, use a tissue or toilet paper to blot your t-zone instead of adding more makeup on." —Colgate Optic White Designer Smile Squad member, Marianna Hewitt


4. Make Your Foundation Waterproof


"If you already have a foundation that you love but it's not necessarily waterproof, try priming the skin with Milk of Magnesia on a cotton ball (after you moisturize) to lock on the coverage for hours. This helps if you sweat a lot, get insanely oily or if you just want your makeup to stay in place all day!" —Beauty blogger, Nicole Williams


5. Go With Lip Stain


"For the perfect bridal lip, use a stain! You won't have time to re-apply all day and you don't want it rubbing off all over your new husband. Anastasia's new soft coral/pink in Dolce is the perfect color for a bride! Apply just before you walk down the ailse, layer with a sheer gloss for your photos and you're all set." —Celebrity makeup artist, Rob Harmon

6. Prep and Prime


"The secret to long lasting makeup is in prepping of the skin, rather than the actual makeup application. Skin that has not been properly prepped will not be able to hold makeup beautifully. When you see makeup that starts to disintegrate with sweating and dancing, most of the fault lies in the skin preparation before makeup application. Always make sure that you start with a clean face. Wash your face and use a toner or cleanser to completely get rid of all dead skin, dirt or makeup residues. Moisturize your face (under your eyes as well) so skin is hydrated. Freshly hydrated skin will prevent makeup from drying on your skin & will help makeup blend in perfect for a long lasting effect. Follow your moisturizer with a pore primer, that will decrease the look of pores, wrinkles, and lines." —Dina Ramon of TCBeauty Care


7. Layering is Key


"Layering is key, if I have a bride who wants a look involving eyeliner I always trace with black shadow first, and layer with a gel or liquid to ensure the look lasts all night. The same goes for blush, I love layering a cream blush and powder blush, it gives demension, texture and lasts for hours." —Lori Leib, professional makeup artist and Creative Director of Bodyography Cosmetics

Jen Glantz is a "Professional Bridesmaid" and the founder of Bridesmaid for Hire. She's the author of All My Friends Are Engaged and frequently wears old bridesmaid dresses to the grocery store and on first dates.


HOW TO: PARTY MAKE-UP IN 9 EASY STEPS


Your outfit and accessories for the party are all set and the right shoes have been found. So the time has come for that last finishing touch: make-up! RMS Beauty's makeup helps you to create ultra-feminine looks that accentuate your best features ánd nourishes your delicate skin at the same time! What else could a girl ask for? We'll show you two stunning looks - just in time for the holiday season!


Today the second look: Almost nude eyes with seductive lips

Refined base:

1. Apply RMS Beauty's 'Un' cover-up (in a matching skin tone) with a foundation sponge and blend using your fingers.
2. RMS' 'Un-powder' facial powder offers nourishing components and comes in a color neutral version - perfect for all skin tones! Loosely apply with a large powder brush.
3. Finish your perfect base with a touch of color using a blend of two colors of RMS' Lip2Cheek. Apply the colors Smile and Curious with your fingers and blend till the right hue is achieved.


Subtle shine on the eyes

Use an eye-shadow base before following the steps below.

4. Use fingers or a brush to apply a blend of RMS Beauty's Eye Polish in the colors Lucky and Magnetic. These products contain natural minerals that work as a nourishing moisturizer.
5. Darken your lashes with the Defining Mascara from RMS Beauty.
6. If you wish you can finish with a subtle line around the eyes using a kohl pencil - preferably in warm tonal hue.


The finishing touch

7. We've used RMS' Lip2Cheek in the color Illusive, topped off with Lip Shine in the color Content. Both products take care of your lips with added vitamins and nutrients!
8. A beautiful glamorous finishing touch is only a step away with the Beauty Luminizer from RMS. Apply underneath the eyebrows, on the cheekbones and a tad on the forehead. Blend with your fingers for a naturally highlighted result.
9. Fixate your look with COOLA's Makeup Setting Spray - for a beautiful look that lasts.


How To Make Hazel Eyes Pop at Home


When you have hazel eyes, your eyes aren’t just one color. Aishwarya Rai, Tyra Banks, Kelly Clarkson, and Angelina Jolie are some of the notable celebrities who possess such colored eyes. There are usually flecks of multiple colors in there, and you can totally play this to your advantage. A great way to bring these colors out is by using different eyeshadow colors.

How To Make Hazel Eyes Pop?


Here, I’ve compiled a list of 10 best eye makeup looks which make your hazel eyes pop and flatter. Check them out!

Purple Smokey
Simple Cat Eye


1. Purple Smokey Eye Makeup


A great way to bring out the color of your eyes is to use colors from the opposite side of the color wheel. And somewhere along the opposite spectrum of the color wheel for hazel are purple tones. In order to achieve this look, bright purple, aubergine, and black shades have been used.

Products To Create Purple Smokey Look

  • Eyeshadows by MAC.
  • Eyeliner by Makeup Revolution.
  • Mascara and false lashes.

Tutorial on How To Get Purple Smokey Look


  • Start by packing on some of the bright purples on the lid, but don’t extend the color too much.
  • Go over it with the aubergine shade and blend it on the outside corner and crease. Then, using the black eyeshadow, define the outer corner.
  • Using a clean brush, blend it out so that there are no harsh lines. By using appropriate transition shades, you can make your hazel eyes pop.
  • Attach the falsies.
  • Finish with some mascara.

This Purple Smokey eye look is more suitable for pale skin.

2. Hot Pink Eye Makeup


Adding bright colors to your eyes is a definite way to make them stand out. A hot pink eyeshadow would do just that. Using a primer before applying the eyeshadow is a good way to start since it prevents the eyeshadow from melting into the creases.

Products Required to Create Hot Pink Eye Makeup Look

  • Peach Smoothie, Creme Brulee, Shimma Shimma Eyeshadows by MUG.
  • Melt Cosmetics Radioactive Stack in the shade Radioactive.
  • Mascara.

How to Get Hot Pink Eye Makeup Look?

  • The way to achieving this bright pink look is by starting off at the crease with a hot pink shade. Take your time in blending it out, because that makes all the difference. Work with a little amount of product at a time to get a diffused look.
  • Now pack on a frosty shade at the center of the eyelid and the browbone. Use a clean fluffy brush to blend the colors.
  • Dab some purple kohl from on the outer corner of your waterline as well as the center and blend.
  • Finally, to finish this look, use some mascara and a purple liner to create a wing. You will have yourself hazel eyes that pop through these gorgeous fuschia colors!

This Hot Pink Eye Makeup look is more suitable for Warm skin tones.


3. Black and Gold Glitter Eye Makeup


Gold and black –
A powerful combination. The gold makes the flecks in the eyes pop out and the black adds a strong contrast with hazel eyes. To achieve this look, you will need a pigmented gold with micro glitter and a gray-black shade.

Products to Create Gold And Black Glitter Look
  • Eyeshadows by MAC.
  • Eyeshadows by Make Up Revolution.
  • False lashes by Red Cherry.
How To Do Black and Gold Glitter Eye Makeup?

  • Start off by priming the eyelid and going over it with a neutral shade matching your skin tone in order to create a transition shade.
  • Using a sticky tape, apply the black eyeshadow along the lower lash line to create a refined line as shown.
  • Next, work the metallic black shade on the outer corner and crease.
  • Continue from the outer corner to the lower lash line to derive a smokey look.
  • It is now time for the gold! Pack some of the product into the center and rest of the eyelid. Build the product up slowly to prevent fallout.
  • Pop some of this lightly in the inner corners as well.
  • Finish with fake lashes or just mascara.

This Gold and black glitter look are suitable for all skin tones.


4. Mermaid Eye Makeup Look


Blue, green, and purple is a beautiful combination. It often reminds us of mermaids. These colors create a magical look and bring out the color of your eyes. Prep and prime your eyelid as you normally would and create a neutral base. For this look, we need to start from the outside and work towards the inside. Since this look is a mermaid look, make sure that all the colors that you will be using from the next step are shimmer.

Products To Create This Look

  • Mineral eyeshadow powders by Caylin Cosmetics
  • Maybelline Falsies mascara
Mermaid Eye Makeup Tutorial
  • Taking a subtle orange shade, go over the area above your crease.
  • Next, use a purple shade to apply at the outer corners, crease, and bottom lashline.
  • Use a clean brush to blend the orange and purple.
  • With a metallic blue kohl, line the upper and lower lashlines.
  • Now, grab a metallic blue and cover your eyelid with it and blend.
  • Then, take a bit of green onto the brush and apply it at the center of the eyelid.
  • Use a clean brush to blend out any harsh lines.
  • Once you are happy with the colors and their transitions, finish with some mascara.

This Mermaid Eye Makeup is one of the best choices for all All skin tones.


5. Bronze Goddess Eye Makeup


Bronze eye makeup will make you look brazen and sharp. It compliments the gold flecks in your hazel eyes, and it’s a great look for all occasions. This look will require shades of bronze and copper and an eyeliner.

Products To Create Bronze Goddess Eye Makeup Look
  • Eyeshadows from the Naked palette by Urban Decay
  • Illamasqua gel eyeliner
Bronze Goddess Eye Makeup Tutorial
  • Prep and prime your eyelid and browbone.
  • For this look, we see that the eyeshadow is extending in a sharp line. To achieve this, you will need to use some tape along the lower lash line.
  • Apply a copper shade over the eyelid.
  • Now take the bronze shade and apply it into the crease and browbone.
  • Using a clean fluffy brush, diffuse it out.
  • Finally, create a winged line with a navy blue liner and top it with mascara.

Bronze Goddess Eye look is more suitable for Warm or dark skin.

6. Tropical Sunsets


Can’t go on vacation anytime soon? Bring the vacation to you! With colors like orange, purple, and gold, you’re bound to brighten up your eyes (and mood) and make them pop.

Products To Create Tropical Sunset Look

  • Mi Vida Loca eyeshadow palette by Kat Von D.
  • 24 karat glam liner by Nyx Cosmetics.
  • Ardell lashes in 160 black.
How To Do Tropical Sunset Eye Makeup?
  • Begin by prepping and priming your eyelids.
  • Apply a yellow eyeshadow under the brow bone to start off the gradient look.
  • Next, apply an orange-toned eyeshadow a bit lower than the first layer.
  • With a clean fluffy brush, diffuse these colors so that there are no sharp lines.
  • Pack some purple eyeshadow at the center and outer corner and blend them out as shown in the image.
  • It is now time for the bling to top it off – the gold winged liner. The gold adds quite the contrast to the purple and brings out the gold flecks in hazel eyes.
  • Finish with false lashes or mascara.

This is one of the best suited and favorite looks for Fair skin tones.


7. Classic Black Smokey Eye Makeup


You cannot and will not go wrong with the classic black smokey eye. The intensity of the black will bring out the color of your eyes. It provides a strong contrast to the warm colors found in hazel eyes.

Products To Create Classic Black Smokey Look

  • Naked eyeshadow palette by Urban Decay.
  • Perversion mascara by Urban Decay.
Tutorial on How To Get Classic Black Smokey Look?
  • Once you have primed your eyelids, use a neutral brown tone suitable for your skin under the browbone so that a perfect transition can be created.
  • Pack the black eyeshadow onto the eyelid in batches.
  • Slowly build the product to achieve the required intensity.
  • Use a clean fluffy brush to blend it out.
  • Apply some of the product under the lower lashline as well.
  • Using a black kohl, line the upper and lower lashlines.
  • Finish with mascara.

This classic black smokey look is more suitable for fair and warm skin tones.


8. Hide And Seek Pink


This is a spinoff of a winged liner. Instead of going for a plain winged liner, you can make your eyes stand out by adding a hint of color. In this look, the color being used is pink. You can use any other color, but make sure that it is bright.

Products To Create Hide And Seek Pink Look

  • Pink eyeliner by Shu Uemura
  • Black eyeliner by Bobbi Brown
How To Get This Hide And Seek Pink Look?
  • Prime and prep your eyelids.
  • To create this look, use a black liner to create wings as you normally would.
  • Then, create a line underneath the black line of the extended wing with the pink one as shown.
  • Put some shimmer on the inner corner.
  • Finish with a coat of mascara.

Hide and Seek Pink Look is most suitable for all skin tones.


9. Royal Blue Eye Makeup


Although this shade isn’t completely royal blue, it is along those lines and it definitely looks regal. This is a sure shot way to make your eyes pop.

Products To Create Royal Blue Look

  • Seventeen Single Eyeshadow in the shade Regal.
  • Kiko eyeshadow stick in the shade 31.
  • Revlon Single Eyeshadow in the shade Periwinkle.
How To Get Royal Blue Look?
  • Start off by priming your eyelids and applying a neutral base.
  • Pack a navy blue shade onto the eyelids in such a way that it looks intense and pigmented.
  • Now, take a fluffy brush and blend it.
  • Apply a lilac shade at the inner thirds of the eyelids and diffuse it with the previously applied navy blue.
  • Use a neutral brown shade to blend out the harsh lines under the brow bone. Use a clean fluffy brush so that the transition is clean.
  • Apply some lilac kohl on the lower lashline and finish with a winged liner and mascara.

This Royal Blue look is most suitable for Warm undertones.


10. Simple Cat Eye Makeup


A simple flick goes a long way. When you don’t have any time but want to add an oomph factor to your eyes, wing out that eyeliner and you’re good to go. I understand that it can be a challenge to do your makeup when you are in a hurry. A simple cat eye will make it look like you have put some effort into it.

Products To Create Simple Cat Eye Look

  • Maybelline Gel Eyeliner.
  • Perversion mascara by Urban Decay.
How To Get Simple Cat Eye Look?

  • The trick to perfecting the cat eye is small strokes.
  • Start from the inner corner and remember not to pile on too much product at one go. You can always build it up later.
  • Now comes the tricky part – the wing. Remember that the wing is supposed to be an extension of your lower lashline.
  • Follow its path and you can’t go wrong. If you are worried about whether or not your hands are stable enough to do this, you can use a card of some sort and place it under your eye along the path of the outer corner of the lower lashline.
  • When you are satisfied with the line, you can join it with the rest and fill in any gaps.
  • Finish with mascara.


Best 25 Eye Makeup Tips For Beginners


Whether you’ve been a dedicated makeup enthusiast or you are someone who’s just starting out with makeup, when it comes to the eyes, makeup can be a little tricky. There’s no harm in having a few tricks up your sleeve so you can work that magic and achieve eye makeup that is so on-point. We’ve put together a list of 25 simple eye makeup tips for all the beginners out there who have been overwhelmed by all that they come across in the world of makeup.


Worry not, we’ve got your back! Just keep these simple tips on top of your mind when you’re doing your eyes, and you will go straight from being a novice to a Pro.

Simple Eye Makeup Tips For Beginners

  • Eyeliner Tips
  • Mascara Tips
  • Eyeshadow Tips
  • Eyebrow Tips


1. Eyeliner Tips


Eyeliner may or may not be a staple for you, but it is one of the most basic steps of doing your eye makeup. It gives you the freedom to work on the shape of your eyes, emphasize them and fill in any sparse looking lashes. It depends on the texture of the eyeliner and your preference as to how you’d like to apply this – clearly defined or smudged – it looks great either way.

Let’s take a quick look at some of the tips and techniques for this step.

  1. Ensure your eyelids are clean and then apply a primer on them, so the eye makeup does not smudge and stays on for longer.
  2. To make your eyelashes look denser, apply the eyeliner as close to the lashline as possible so it appears to be a part of your natural lash line. This is called tight-lining. Make a dotted line from the outer to the inwards corner and connect the dots (you can use a stiff slant brush to blend the dots out into an effortless soft line).
  3. Make sure the tip of your liner is thin but blunt to achieve precision and so you get the perfect shape. You can also freeze your eyeliner before sharpening to keep it from crumbling.
  4. To accomplish the perfect winged eyeliner, use a liquid liner – start on the lash line at the pupil and work your way towards the corners. If your hand is not steady enough for liquid liner then the first line your eyes with a pencil liner, then trace over it with your liquid liner.

(If you’re in a rush, you should just skip the liquid liner in your best interest!)

  1. To accomplish a smoky eye, opt for a pencil liner as these tend to be softer and creamier. Also, you can smudge it out using a smudging brush for that effortlessly cool smoky eye.
  2. As you age, opt for more subtle colors like brown for a more elegant look and apply mascara to complement the simple look.


Note: Always tilt your face up and look down as you apply eyeliner. Doing this ensures you achieve symmetry.

2. Mascara Tips


Don’t you agree that mascara completely transforms your eyes, giving you that extra oomph? The magical mascara wand makes you look bright-eyed and youthful. It’s a total game changer and the only kind of drama that I like.


Here are some important tips for bang-on mascara application.

  1. Always start applying your mascara from the roots of your lashes and wiggle your way to the tips. Doing this instantly volumizes your lashes and does not weigh them down.
  2. After applying one coat of mascara, wait for about ten seconds to go in with a second coat (if desired). This way, your lashes don’t get clumpy!
  3. Wipe off excess mascara from the wand on a tissue before applying, so it’s easy to maneuver and won’t clump (you will also avoid the horrid spidery-lashes look).
  4. Before you go in with mascara, always make sure to curl your lashes using a high-quality eyelash curler. When you go in with curling, pinch your eyelash curler at last base and hold it tightly rotating upwards.
  5. The way you hold your mascara matters! Hold your wand horizontally for thicker lashes and vertically (especially for the lower lashes) for a more natural look.
  6. If you want to make your mascara last longer, then stop pumping the wand while pulling it out (this way you are only sending in the air to dry the product out), just swirl it to prevent it from drying out.

Note: For best results, mascara should be the last step of your eye makeup.

3.Eyeshadow Tips


  1. Eyeshadow does the job of adding depth and giving dimension to your eyes. If it’s applied correctly, it makes your eyes look bigger and helps accentuate your eye color. Want some tips?
  2. Invest in high-quality products and brushes. They will go a long way besides ensuring proper application and blending.
  3. If you want your eyeshadow to stay put all day and not crease beside wanting the eyeshadow color to really pop out – use a good primer before you go in with the eyeshadow.

On the other hand, if you want to make a less pigmented eyeshadow look vibrant and poppy, cover your eyelid with a white eyeliner first. This helps to cancel out the color of your skin and it creates an even base for your eyeshadow.
  1. For the bottom area of your eye (that is just near the lash line) – use a dark shade of eyeshadow, for the area above that, use a medium shade and for the top, use a light shade and blend them well.

4.Eyebrow Tips


Eyebrows are often underrated, and I can’t begin to stress how important they are to provide a structure to your face. Well groomed brows are indeed a game changer, they frame the eyes and them drastically ‘up’ your beauty quotient. If you are someone who has over-plucked them, then worry not, because just a little bit of added definition will make a big impact!


Want some tips?

  1. There are various brow products available in the market. Pick a shade that best suits your hair color and fills in any gaps using the product.
  2. The most important thing to remember while defining your eyebrows is to keep the look as natural as possible. For this – make sure to blend the product out properly to avoid any harsh lines and such.
  3. Use a subtle highlighter right beneath the brow, under your arch to show off the shape and to add height to your brows.
  4. If your eyebrows are out of control, use an eyebrow gel to keep them in place. They also tend to look a lot better and groomed with just a little bit of that gel.
  5. Do you want to know the best trick in the book? For a bolder look, use an angled stiff brush and wet it before you fill your brows in with matte brown eyeshadow.

Some Other Eye Makeup Tips For Beginners


  1. To avoid your base from ruining due to eyeshadow fall-out, finish your eye makeup first and then proceed with the base to ensure your makeup looks fresh.
  2. If you are planning to wear loud eye makeup, keep the lips subtle. It’s always best to emphasize one feature at a time.
  3. To make your eyes look brighter and youthful, highlight the inner corner of the eyes with a light color of eyeshadow.
  4. If you want to instantly curl your stubborn lashes, use a blow-dryer on your curler (ensure it’s not too hot) before you curl them – this way, they will stay curled for longer.
  5. If you’ve got an excess product, say eyeshadow, use a blotting paper to remove the excess eyeshadow without disturbing the eyeliner.

Those were some really simple eye makeup tips and hacks for every beginner out there who have been overwhelmed by the world of makeup. These tips cover all the basics and hopefully, you will keep some of these pointers in mind the next time you’re doing your makeup.

Now that you have some tricks and techniques of how to put these products on, it’s time you learned a thing or two about how to remove eye makeup too. It’s critical for you to take off every bit of makeup at the end of the day to ensure your eyes and skin remain healthy. There are a lot of ways to remove waterproof, stubborn makeup. Let’s look at a few easy ways to remove eye makeup.


10 Things Women With Clear Skin Do Every Day, According to Dermatologists


Clear skin: we all want it. But, between hormones, pollution and other pore-clogging aggressors waiting to wreak havoc on our complexions, achieving a clearer, blemish-free complexion can seem like an impossible feat. Fortunately though, according to dermatologists, it’s totally attainable, but it does require a few lifestyle changes to get your skin right back on track. To find out for ourselves what women with clearer skin do (almost) every day, we sought the advice of two top dermatologists. See their expert tips below.

1. They Cleanse With a Sonic Cleansing System


If you want clear skin, you’re going to have to cleanse better. According to a board-certified dermatologist and author of Skin Rules: Trade Secrets from a Top New York Dermatologist, Dr. Debra Jaliman, a sonic cleansing system is the best way to start, “as it takes off more dirt, bacteria, and makeup from your skin.” In addition to providing the skin with a deep cleanse, sonic cleansing brushes exfoliate the surface of the skin, leaving it looking and feeling softer and smoother, thus revealing a more clear complexion.

Try: FOREO LUNA™ mini

2. They Use Mild Cleansers


On top of cleansing your complexion with a sonic cleansing system, Dr. Jaliman suggests switching to a mild cleanser. If you are experiencing breakouts, a mild cleanser allows you to cleanse your complexion thoroughly without stripping the skin of its natural oils. Stripping the skin of its natural oils can often lead to an increase in oil and more breakouts. Since mild cleansers are more gentle on the skin, you can follow up your regimen with a stronger acne product that targets breakouts.

Try: Glytone Mild Gel Cleanser

3. They Apply Topical Retinoids Before Bed


If you are experiencing a bout of acne, board-certified dermatologist and Director of Clinical Research at the Laser & Skin Surgery Center of New York, Dr. Jeremy Brauer suggests giving topical retinoids a try. Applying a topical retinoid made from antioxidant-rich vitamin A to your complexion as part of your nighttime routine can help to unclog follicles and in turn, may help acne treatments work better and faster.

Try: Avene Retinal 0.1 Intensive Cream

4. They Go Hands-Free


We hate to break it to you, but your cell phone could be the reason for your breakouts. According to Dr. Jaliman, the bacteria on your phone will cause breakouts. Her solution? “Don’t rest your phone against your face, use earbuds instead!” In addition to earbuds, you should also consider wiping your phone down with a disinfecting wipe or cotton pad dampened with rubbing alcohol.

5. They Don’t Pick, Poke or Pop Pimples


We know you’ve probably been told this a thousand times, but we thought one more reminder wouldn’t hurt. According to Dr. Brauer, picking, poking and popping your skin will not get you the results you’re looking for. If you have a pimple that you’re desperate to pop, try applying a spot treatment or pimple cream to the affected area instead of picking. After all, pimple creams are designed for this sort of skincare woes.

Try: Kate Somerville EradiKate Acne Treatment

6. They Skip the Junk (Most of the Time)


As much as we hate to admit, we’re all a little guilty of splurging on junk food every once and a while. And while it may be satisfying to our cravings, junk food is not beneficial for our skin. Dr. Jaliman suggests cutting down your processed food, sugar, and dairy intake since those can lead to breakouts and recommends “eating a diet rich in antioxidants instead.” That being said, you can still succumb to your sweet tooth with a healthy sweet, like antioxidant-rich fruits and berries.


7. They Get a Good Night Sleep


Easier said than done, right? But, for the sake of clear skin (and your sanity), Dr. Brauer says to make it a point to get a better night’s sleep. When you sleep, the skin works to restore itself through a process called regeneration and lack of sleep can lead to a tired-looking complexion, dark circles, puffy under-eye bags and sometimes even breakouts. Whether this means turning your phone or TV off an hour earlier than usual, taking a relaxing bubble bath before bed, or giving meditation a try, you’ll be glad you did!

Try: Perricone MD Sleep Booster Whole Foods Supplements


8. They Use a Clay Mask


Need a facial but don’t have time? Dr. Jaliman suggests treating your complexion to a weekly at-home clay mask facial. You can use your favorite bentonite-infused face mask or create your own! To DIY your own clay mask, Dr. Jaliman suggests combining two tablespoons of all-natural calcium bentonite clay powder with one tablespoon of water and one tablespoon of honey to form a paste. Apply it onto the skin and let it work its magic for 10 to 15 minutes before rinsing off with a warm washcloth. Pat the skin dry and voilà! “This will leave your skin feeling smooth, yet hydrated,” says Dr. Jaliman.

Try: GLOWBIOTICS MD LET ME CLARIFY Probiotic Purifying Clay Mask


9. They Use a Toner


If you aren’t already using a toner in your morning and evening skincare routine, now is the time to start. Dr. Jaliman suggests choosing “a toner with glycolic acid or salicylic acid to unclog the pores for clearer skin.” In addition to promoting clearer skin, toners can also balance the skin’s natural pH level and soothe your complexion.

Try: SkinCeuticals LHA Solution


10. They Don’t Skip Out on Sunscreen


When it comes to breakout-prone skin, finding a sunscreen that works with your skin type and doesn’t cause new blemishes is actually easier than you may think. Dr. Brauer suggests choosing a broad spectrum, meaning an SPF that will protect your skin from both UVA and UVB sun rays.


Best Beauty Care Salon in Lucknow.
Beauty Parlour in Lucknow.